
Other references:
- Email/drip marketing (multi-phase) campaigns, click here.
- Creating templates, click here.
- Creating bulk email lists, click here.
All campaigns are handled through the Projects module. The process is divided into 2 parts: Design and Implementation.
A campaign can be:
-
to a single contact
-
a pre-defined group
-
comprised of any series of steps you require to be carried out
A campaign step can
-
contain event triggers and/or instructional information
-
be scheduled for any date
-
carry out email, print or phone functions
-
be assigned to another user for implementation or executed by the designer/creator. Either way, both the designer and the implementer are notified in their Home page of current and overdue campaign steps
Functions
-
New campaigns can be started from scratch, or cloned from another campaign.
-
Campaign design and implementation is managed, monitored and tracked through your Home page.
-
Campaigns can be ascribed to the Hot tab on the Home page to quickly access "template" or favorite campaigns you want to clone on a frequent basis.
Design process
-
Typically, a prime campaign contact list is initially created using the Query Builder to run a query.
-
A campaign could use more than one query for its steps, depending on the requirements of a particular campaign step.
-
The query that produces the list can include filters based on custom fields designed for the specific campaign.
-
The design phase can include field customization in the Contacts database to accommodate specific information tracking for the campaign. As the campaign progresses, feedback may be periodically entered in those custom fields and may thus affect the on-going contact list.
-
A campaign step is displayed in its own window, leaving the user full access to all of the other modules during the process.
Steps
Email steps -
typically use pre-defined word processing documents as templates, created in the word processing module, Quill.
can include field name placeholders, including custom fields. At runtime, those placeholders are replaced with the live data from the specific contact's database record (first name, last name, address, etc.). Emails are populated from these templates.
Phone steps provide a list for all the standard phone numbers of each contact.
Print steps -
trigger the preparation of a CSV file through Query Builder which is then be offloaded and used in for mail-merge or address labeling in any word processor.
typically use the same prime campaign contact list query to run a CSV output.
All campaign steps:
A contact view button provides direct access to the contact module and the specific contact's record and enables preparation of activity notes, callbacks, messages, etc.
Successive steps can use the same or different templates.
Steps can provide step-by-step informational instructions as well so that the implementer only need follow the written instructions to complete the step.
Email steps are automated, phone steps can include phone scripts and print steps provide instructions on displaying the query and outputting the CSV file.
The design of a campaign can be complex, and is best carried out by an experienced individual. However, the implementation or running of the campaign - particularly email and print steps - can be easily handled by most staff, including administrative personnel.
Runtime events
-
A campaign step can contain detailed, step-by-step instructions so that it can be quickly and easily run by anyone.
-
Steps are typically one-button: after displaying the step, the implementer usually has to click only one button to execute the step, no matter how complex the step is.
-
By using filters in the query builder based on custom fields, the list can be dynamic.
As the campaign progresses, custom and standard contact fields could be updated in the contact database, thus changing the list content on-the-fly, to reflect campaign events. In this way, the campaign list can be successively narrowed to focus on the desired contacts.
-
Each step can be assigned to a specific person to run.
-
Email steps can designate the email sender so that one step could be a message from the CEO, another some sales update information from the sales people, another from the support department, and so on. The step does not have to be run by the person designated as the email sender.
This allows complete campaigns to be run by one person, but appear to be coming from many people in the company.
-
Steps cannot be modified by the implementer where that person is not the original designer.
-
In the event a step is not run on the scheduled date by the implementer, the designer is notified on his/her Home page that the step is still outstanding, and can take prompt action.
-
The step's event(s) is(are) triggered from a read-only Project Step activity record and will display the Quick return mini-window and the full "Campaign Central" window (where the step's list, email content and attachments are presented).
This way, the implementer can view any underlying modules and use Quick return to jump back to the Project Step activity record.
Anatomy of a campaign in images:
From the Home page, open the Projects module and click [New] or click [Campaign] on right side of your Home page
[not yet completed]
Design consists of these main tasks:
- Decide the campaign type: one contact or group
- Set up custom fields (and panels) in the contact file (optional)
- Create the contact list(s) according to filtered criteria
- Bulk update custom fields from initial list (optional)
- Create templates, including field placeholders
- Create the campaign (project) record
- Create the programmed steps and campaign event triggers
- Create reminders (callbacks) to campaign implementers
The designer and the implementer may be one and the same person, or different people. Through the reminders, the implementer will access the campaign and execute the events of the campaign.
When properly structured, a campaign requires little, if any, experience on the part of the person designated to execute the campaign (the implementer).
As part of the design stage, the designer will create reminders for the key event dates. The reminder will be assigned to the implementer who will see the current and overdue reminders as callbacks on their home page, like this:
Executing a campaign step is then 3 steps:
1. From the reminder, open the campaign project record.
a. Click the callback icon to open the list of current callbacks:
b. Locate the applicable reminder record and click the folder icon to open it:
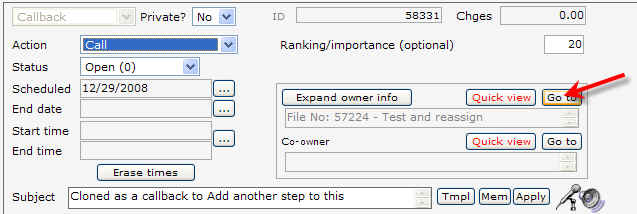
c. From the record, click [Go to] to open the actual campaign record.
c. From the record, click [Go to] to open the actual campaign record.
2. In the from the campaign action record
Creating a campaign - designing
A campaign's creation can be simplified by cloning an existing campaign. A project record and all the programmed activity records will be automatically created, and the dates of those records will be updated to be consistent with the current date.
Custom fields
1. The designer will work with the Administrator to set up custom fields in the contact file and to insert default values into the initial contact list, where needed.
Typically, a custom panel would be used to hold the campaign's fields. Fields can be set up to assist in filtering the contact database. They can also be used to record feedback from the campaign. This is an Administrator function.
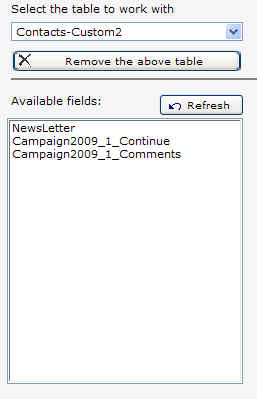
For our purpose, we will assume these fields are required during the campaign process:
a. Newsletter : Yes/No - does the contact agree to receive our newsletter?
- Field name: NewsLetter
- Label: Newsletter?
- Field type: string, length 5
- Present as: drop down list
b. Continue campaign : Yes/No - does the contact want to withdraw from the campaign?
- Field name: Campaign2009_1_Continue
- Label: Continue 09?
- Field type: string, length 5
- Present as: drop down list
c. Campaign feedback : text - comments on the campaign from anyone, including the contact
- Field name: Campaign2009_1_Comments
- Label: Comments on campaign 09
- Field type: string, length 250
- Present as: text, 4 lines
There could be several fields needed for the campaign. Add them as needed.
Where fields are defined as lists, don't forget to select the [Lists] tab and populate the lists. For example:
- add the "non-selection":
- add yes and no:
(Remember to save the list information by clicking [Update database]
To produce:
[more information coming]
NOTE: down the road, when the fields are no longer applicable, you can choose to hide or delete all or some of the fields. Or you can relabel them for more current campaigns.
Initial settings
From the example above, the custom fields are created:
 |
 |
and appear in the contact detail as:
 |
![]()
Designing a campaign generally requires the services of someone experienced in both campaign structures (templates, steps, instructions) and all the main modules, including those covering and project, opportunity and sales functionality. That person will be responsible to:
- describe the campaign in the Projects record
- create (or clone) the various steps that need to be taken
- create reminders (in the form of callbacks) for and messages to the individual responsible for the particular step.
Each step in a campaign can be email, print or phone. The campaign is not limited to one media type.
Since campaign steps may require personalization, embedding of field placeholders in document templates is supported. Any field, including custom fields, can be so embedded. For example:
Dear {{firstname}} We are contacting you because you have subscribed to our newsletter and indicated you want to ... |
Key steps in designing a campaign:
1. Create custom fields in the Contacts table to hold special information about the contact and their appropriateness for, and responses to the campaign. For example, the initial campaign list might comprise only those contacts who live in a given area and who have indicated they want to receive brochures or other company information.
1. Start a new or clone an existing project. (Cloning a campaign will also clone its programmed activities - tactics/steps).
2. Select type as Campaign (see Some background things to do below)
3. Enter
[more information coming]
Some background things to do:
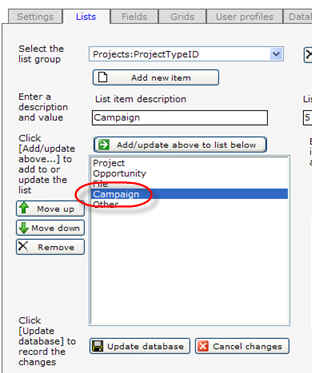
1. Administrator: add "Campaign" to [Lists] > Projects:ProjectTypeID and position it something like this:
More...
Field placeholders
Placeholders are indicated by double curly brackets around the field name. Any field in the Contacts table is eligible. To see the fields, run the Query Builder, click [Define] and add Contacts as a Primary Table. The field list will display. If you wish to view the contents of the table, select all the fields ([Check all]) and [Run] to view.


